Luxurious Wedding Favor Ideas That Your Guests Will Remember Forever

Add these wedding favour ideas that blend luxury with heartfelt touches. From exquisite gourmet treats to personalised keepsakes, these  options are curated to leave a lasting impression and add a touch of sophistication to your special day. 

Gourmet Truffles

Delight your guests with gourmet truffles that are both delicious and elegantly packaged. These indulgent treats offer a taste of luxury and are perfect for leaving a memorable impression.

Mini Succulent Plant

Offer your guests a living keepsake with mini succulent plants. These low-maintenance plants symbolise enduring love and serve as a charming reminder of your special day, adding a touch of greenery to their homes.

Mini Champagne & Wine Bottles

Celebrate with miniature bottles of wine or champagne, allowing your guests to toast to your future. These sophisticated favours are perfect for adding a touch of elegance and sharing your joy with loved ones.

Personalised Newspaper

Design a custom newspaper featuring highlights from your wedding events. This unique favor provides a nostalgic touch, allowing guests to relive your special moments in a creative and memorable way.

Deluxe Trail mix

Surprise your guests with a deluxe trail mix featuring high-quality nuts and dried fruits. Packaged in stylish containers, this upscale snack combines sweet and savoury flavours, making it a delightful treat.

Monogrammed Handkerchief

Add a personalised touch with monogrammed handkerchiefs. These elegant and practical favours are a sophisticated way to show appreciation, offering a classic keepsake that guests will cherish.

Silk Pillow Case

Gift your guests luxurious silk pillowcases for a touch of comfort and elegance. These high-end favours not only enhance their sleeping experience but also serve as a cosy reminder of your special day.

Must Have Food Stations At Your Wedding

Planning the perfect wedding involves countless details, but one of the most memorable aspects for guests is undoubtedly the food. It not only satisfies the taste but also adds a festive element to your celebration. Whether you are looking for gourmet elegance food or a comfort food charm, we have got you a few options which you must include in the food menu.

Planning the perfect wedding involves countless details, but one of the most memorable aspects for guests is undoubtedly the food. It not only satisfies the taste but also adds a festive element to your celebration. Whether you are looking for gourmet elegance food or a comfort food charm, we have got you a few options which you must include in the food menu.

Here are few standout ideas to transform your wedding day with extraordinary food stations: 

  1. Cheese Platter Station : Delight your guests with a sophisticated cheese platter station, featuring an exquisite selection of cheeses ranging from soft, spreadable varieties to aged, crumbly classics.

    Cheese Board
  2. Fondue Fountain : Time to add a  sweet touch to your celebration with the fondue fountain, featuring rich, melted chocolate and a variety of dippable treats for a fun and delicious experience.

    Chocolate Fondue
  3. Churros Station : Sweeten your guests’ day  with freshly made churros! Let them choose their toppings and enjoy a delicious, sugary treat to celebrate your wedding.

    Churros Station
  4. Dim Sum Station: Delight your guests with a Dim Sum station, offering an array of freshly steamed dumplings and savory bites. Savor a variety of delicately prepared dumplings and baos, each designed to enhance elegance.

    Dim Sum Station
  5. Khow Suey Station : Delight with a customizable bowl of rich, aromatic noodle soup, paired with an assortment of high-quality toppings for a truly refined experience.

    Khow Suey Station
  6. Kulfi Station : Kulfi is the perfect mood booster.This beloved treat never fails to please. Treat your guests to something refreshing and delightful that will help them relax and fully enjoy the celebration.

    Kulfi Station
  7. Sushi Station : Add a Japanese touch to your Indian wedding with a variety of sushi options. Let them experience a taste of Japan right at your wedding.

    Sushi Station
  8. Ramen Station : From spicy and tangy to umami-packed, each broth offers a unique taste experience. Accompanied by a selection of savoury toppings like tender pork, crisp vegetables. This interactive element not only satisfies a range of palates and encourages guests to mingle as they customise their own bowls of ramen.

    Ramen Bowls

These stations are a fantastic way to cater to diverse tastes and preferences of all age groups, while adding a fun and interactive element to your celebration. Transform your wedding from a mere dinner to a culinary adventure that guests will savour long after the final day!

Celebrate Holi With This Delicious Thandai Recipe

Holi, also known as the festival of colours, is one of India’s most celebrated festivals. It is a springtime celebration when people get together to play with colours, eat delicious food, and drink refreshing drinks. Thandai is a sweet and creamy milk-based drink flavoured with a variety of spices and nuts that is often associated with Holi.


Thandai Recipe     

Image credits: https://pin.it/5gbN8B3

Ingredients:

  1. 1 litre of milk
  2. 1 cup of sugar
  3. 1 cup of almonds
  4. 1 cup of cashews
  5. 1/2 cup of melon seeds
  6. 1/2 cup of poppy seeds
  7. 1 tablespoon of fennel seeds
  8. 1 tablespoon of cardamom powder
  9. A pinch of saffron
  10. 1/2 teaspoon of black pepper
  11. Ice cubes
  12. Rose petals and chopped nuts for garnish


Instructions:

  1. Soak the almonds, cashews, melon seeds, and poppy seeds in water for 2-3 hours.
  2. Drain the water and blend the nuts and seeds into a fine paste using a blender or food processor.
  3. In a large pot, heat the milk over medium heat.
  4. Add the sugar and stir until it dissolves completely.
  5. Add the nut and seed paste to the milk and stir well.
  6. Add the fennel seeds, cardamom powder, saffron, and black pepper and mix everything together.
  7. Let the mixture simmer on low heat for 10-15 minutes, stirring occasionally.
  8. Turn off the heat and let the mixture cool down.
  9. Strain the mixture through a fine mesh sieve to remove any solid bits.
  10. Serve the thandai chilled with ice cubes and garnish with rose petals and chopped nuts.


      Thandai Recipe for holi                                                           

Image credits; https://pin.it/1A08N05


Thandai is a traditional Holi drink that many people enjoy. This recipe is simple to prepare and can be made ahead of time, making it an ideal addition to any Holi celebration. So, why not celebrate Holi with this delicious and refreshing thandai recipe this year?


7 Scrumptious & Gorgeous Grazing Boards for Every Party

Picture this – you’ve hosted a party and now you’re constantly worried about the food, if there’s enough for the guests, if the starters have arrived, if everyone’s enjoying it, so one and so forth. 


The party gods have heard your plea and brought in the super fascinating and convenient grazing boards to your rescue. As the name suggests these grazing boards house a variety of delicacies and will last for a while; this way you can ensure you enjoy the party as well. We’ve put together a bunch of some lip-smacking, easy to set up grazing boards for your next house party. 

P.S. These might just get you all hungry! We’ve been nice and warned you. 

The Munchie Board 

Hosting a game or movie night with a few drinks? Well, this one’s your go to board. It has all the essentials to make for a delicious affair. We’re talking jalapenos, crispy fried chicken, salty pretzels, chips and dips, crackers and the works. If you’re feeling a little fancy, throw in some cheese too. 

What’s not to like in this one? 


Grazing Board Ideas


Carb Loading/ The Carb Lover 

This party is going to be heavy on drinks, you already know. It’s perhaps a brunch, or wait, should we call it a drunch? You can be a good and responsible host and create a grazing board that’s heavy on carb and helps soak in all the alcohol. Your guests will thank you the next day, we promise. 

As the name suggests this includes, different types of bread with flavoured butter, regular butter etc, crackers, mini croissants and the likes.


DIY Grazing Boards


For The Healthy Ones 

Everyone coming to this party is super health conscious and you want to be mindful of that. We suggest taking cues from the Mediterraneans on this one. Mezze this grazing board up with types of hummus, some baba ganoush, muhammara and couscous salad. While it may look intense, most of these things are quite easy to put together. Throw in some ragi/lentil crackers to complete this board.


Grazing Boards


The Dessert Board

This one’s the most indulgent one and also makes for a great display. After you’ve wrapped up a meal at a party, this one can come in as the show stopper. You can go crazy on this one and it can be tweaked according to the theme of your party. We’d say, mini cookies, brownie bites, and some melted chocolates are must haves.


Ideas For Grazing Boards


The Charcuterie

If you’re hosting a party where there’s wine flowing, it’s a tad more formal, you can go with the classic charcuterie which includes meats and cheese. You can also set this up keeping the wine in mind.


Grazing boards


Quick to set up, lasts longer and is delicious. What’s not to love about grazing boards? It’s a trend we’re happy has emerged.  

How to Curate a Perfect Cheese Board in Minutes!

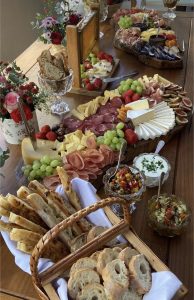
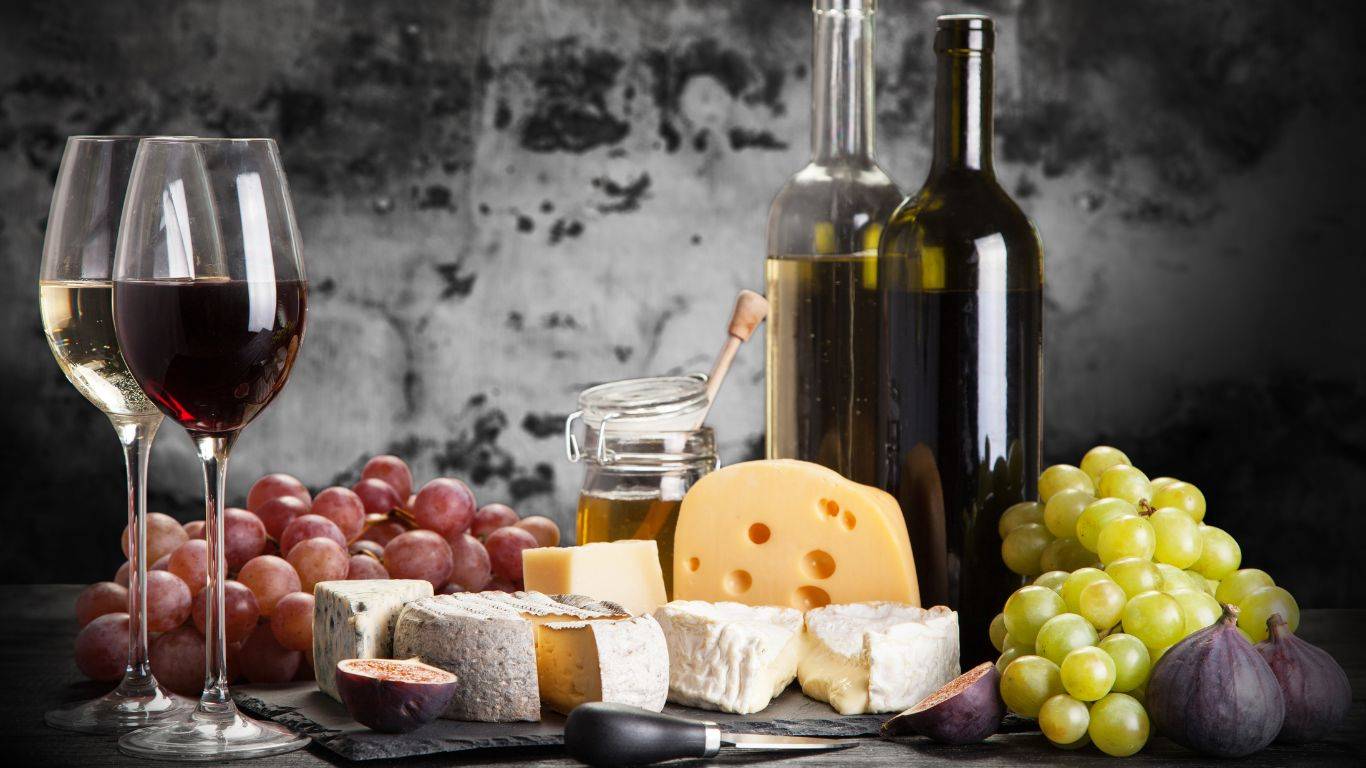
Arguably, a beautiful and well-balanced cheese board is the most fuss-free, versatile, and impressive-looking appetizer that you could serve at gatherings. Be it a holiday, birthday, ladies’ night, or just your usual everyday entertainment, a cheeseboard is an undeniable crowd-pleaser; pair the cheeseboard with the right wine and it can effortlessly elevate the evening. It requires no cooking or extra work upon serving, and is more of an assembling and decorating job that can be super fun and more importantly, something that you can nail in minutes!

But how can we transform a classic cheeseboard into a beautiful visual statement? From cheeses to charcuterie and everything in between, read on to know more about the anatomy of a perfect cheeseboard.

Step 01: The Tools

Start with gathering all your essentials (there aren’t many!) so you can jump right into the assembling. Here’s a list of all the tools that you’ll need.

  1. An actual cheese board or charcuterie board: Wooden is a great choice that sways as both sophisticated and rustic, but you could also go for marble or slate. Handles are always a plus, and we recommend choosing a board with ridges to hold fruits in place (just in case your grapes and berries are planning to roll all the way down).
  2. Cheese knives: Essential to avoid flavor mingling, and for crafting those perfectly cut cheese slices every time!
  3. Cutlery set: You can have a set of small tasting spoons, forks, and cheese knives handy for your guests to dig into the board.

Small serving bowls: Keep these on standby for guests who’d like to keep the ingredients separate from one another to avoid mixing the tasting palette.


Cheese Tools


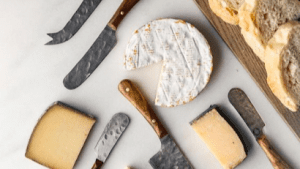
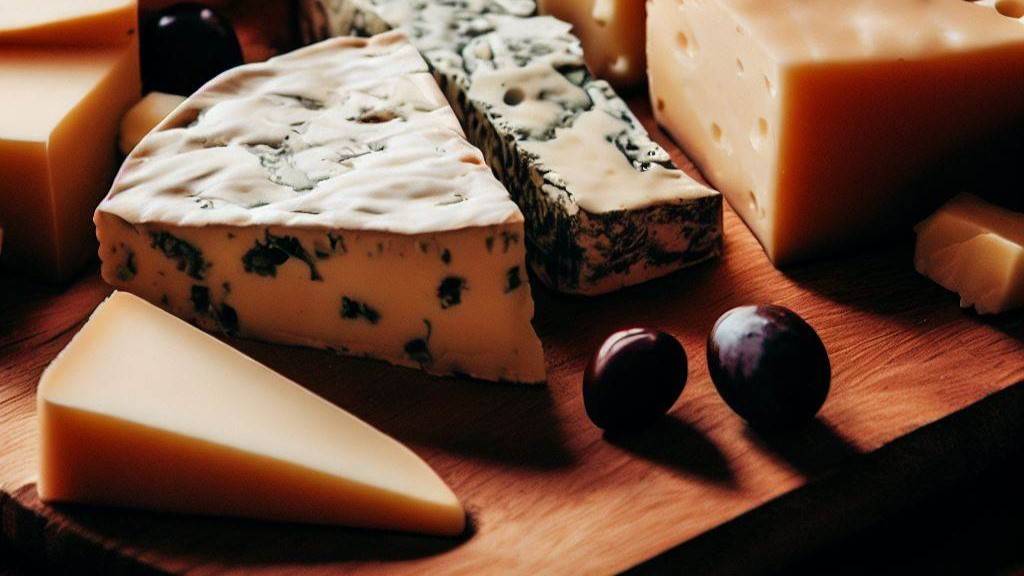
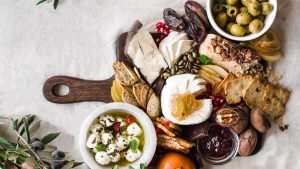
Step 02: The Cheeses

Now coming to the star ingredient of the appetizer, the cheese. You’d ideally want to have a variety of textures and tastes. We recommend picking three to five different kinds of cheese for the platter and bringing them to room temperature before serving in order to bring out the flavor. Here’s a mini cheese texture guide to help you pick the right cheese for your board!

  • Soft: burrata, mozzarella and brie
  • Semi-soft: stilton, Fontina, and Gorgonzola
  • Semi-hard: Swiss, comte, provolone
  • Hard: cheddar, parmesan, pecorino 


Cheese


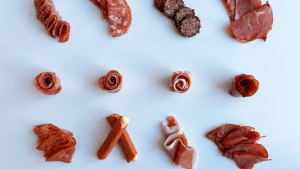
Step 03: The Charcuterie 

Add some charcuterie, also known as cured meats, to elevate the cheese board, and add more substance to the elements. Prosciutto, salami, soppressata, chorizo, or mortadella are all excellent choices that pair wonderfully with the tasting palette of a cheeseboard.


Charcuterie


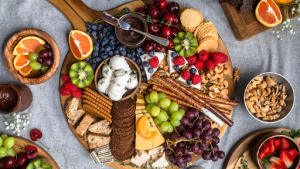
Step 04: Something Sweet 

Think seasonal fruits, sweet grapes and berries are the usual go-to’s but you can also include cherries, peaches, pears, figs, kiwis, and tangerine. Preserves such as honey and fruit compotes such as apricot spread or jams add depth in both flavor and texture. 

You could also use dried fruits such as apricots or dried mangoes, and some even like to add a touch of rich, dark chocolate or chocolate-covered almonds to go along with the cheese.


Cheese Board


Step 05: Something Savoury  

Olives (stuffed are great!), pickles, roasted peppers, artichokes, spiced or salted cashews, almonds, or blanched veggies all make for palatable savory elements that accentuate the profile of the cheeses. 

You can also add some savory condiments such as grainy mustard, pesto, salsa, or chutneys to add a little punch to the flavor.


Cheese Platter


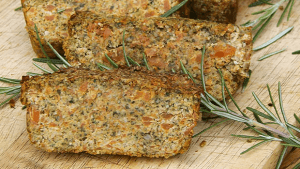
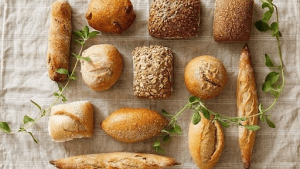
Step 06: A Side of Bread  

A side of the bread is pretty much a staple, no matter what the appetizer. You can use various different pieces of bread to complement your cheese board, think sliced baguette, ciabatta, breadsticks, crostini, crackers, parmesan crisps, etc. 

We recommend checking with your guests about their preferences here, if need be, you can always include a few gluten-free or multigrain options!


Cheese Board Idea


Step 07: Finish with Garnish 

Garnish is a great way to give your cheeseboard a seasonal touch, you can use edible flowers or fresh herbs depending on the tasting notes of your cheeseboard. Rosemary sprigs, sage leaves, and parsley snips are popular garnishes that you could start with!


Cheese and wine board


And there you have it! The anatomy of a perfect cheeseboard that can curate in minutes. There are a lot of ingredient options to sift through but don’t get overwhelmed, you don’t have to include all of these things in curating a perfect cheeseboard. Everyone likes their cheese in their own different ways – some like it savory, some like it sweet, and some like a little bit of both. So as long as you have options, your cheeseboard is well-balanced. One protip to keep in mind is to consider adding a mix of ingredients that offer creaminess, crunch, crumbles, juiciness, and gooeyness – this way you have everything you need for a cheeseboard that leaves you with a full sensory experience.

Oh-so-delicious 5-Course Gluten-Free & Vegan Christmas Recipes

The season of festivities, joy and lots of indulgences is here! Amidst all those parties and commitments, we know you’re pushing all the healthy eats to next year (we’re doing it too, we understand)

And so, we’re here with much needed holiday season recipes that are vegan, gluten free and most importantly – DELICIOUS! You can enjoy these by yourself or prepare them for friends and family as well. We love them all and hope you do too!

THE SNACK

Candied Nuts

Sweet, savoury, crunchy and oh-so-satisfying these Candied Nuts can be made days in advance. Not only do they make a great snack for guests to munch on during your Christmas part, they also make an incredible edible gift.


vegan recipes - Candied nuts


Ingredients:

  • 1 tablespoon water
  • 1 tablespoon coconut oil
  • 1 tablespoon maple syrup
  • 300 grams mixed nuts of your choice
  • 3 tablespoons sugar
  • ¼ teaspoon salt
  • Pinch ground black pepper to taste

Method:

  • Heat water, oil and agave syrup in a large frying pan until it starts to bubble (should take around 30 seconds)
  • Add the nuts and stir until they’re coated with the oil and syrup mixture – do this for around a minute until they’re slightly brown and crispy.
  • Mix together the sugar, salt and black pepper in a small bowl, then add to the pan and stir into the nuts.
  • Keep the pan on a medium heat and stir continuously for a few minutes – the nuts should become nicely caramelised quite quickly.
  • Remove the pan from the heat as soon as you think the caramel coating turns a nice golden-brown colour – be careful to not heat for too long as the sugar will burn very quickly.
  • Spread the nuts out over a plate or a sheet of baking paper, separating out any clumps, and leave them to dry out for a while until completely cooled – they may be quite soft at this stage, but ready to eat once they’ve cooled down. 
  • Keeps in an airtight container for up to a week.

THE APPETIZER

Carrot and Seed Loaf

Gluten-free and vegan, this Carrot and Seed Loaf is as perfect for the festive season as it is all year round. Easy to make, it pairs well with a side salad or along with your favourite dairy-free yoghurt dip.


gluten free recipe


Ingredients:

  • Carrots 3 large sized (or 400g approx.)
  • 150g ground sunflower seeds (1 cup)
  • 150g ground pumpkin seeds (1 cup)
  • 2 cloves garlic
  • 1 heaped tablespoon dried rosemary
  • 1 heaped tablespoon fresh or dried parsley
  • ½ to 1 teaspoon sea salt

Method:

  • Chop the peeled carrots into small pieces. Boil or steam until soft. Drain and then mash.
  • Grind seeds into a coarse powder
  • Crush garlic and finely chop herbs (if using fresh)
  • Mix seed meal, carrots and all other ingredients together.
  • Firmly press mixture into a loaf tin (lined with parchment paper). A 1kg loaf tin works well (approx. 20x10x6cm). Make sure that you press really firmly to encourage the binding process – if you are too timid, it tends to fall apart. If you get it just right, then it magically forms into a perfectly sliceable loaf.
  • Bake in a preheated oven at gas mark 6 (200˚C/400˚F) for approximately 45 minutes.
  • Gently lift from the loaf tin by pulling out the loaf along with the parchment paper. Turn over onto a bread board and slice with a bread knife.

THE MAIN COURSE

Vegan Mushroom & Walnut Balls

All good things come together to create this firecracker of a main course. Filling and delicious as is, better served over gluten-free spaghetti tossed in a simple marinara sauce.


easy vegan main course


Ingredients:

  • 1 cup cooked brown rice
  • 1 caramelized onion
  • 1 tablespoon extra-virgin olive oil
  • 300 grams mushrooms, chopped
  • ½ teaspoon salt
  • ½ teaspoon ground black pepper
  • 1 teaspoon dried thyme
  • ½ teaspoon dried rosemary
  • 1 cup walnuts
  • 1 cup oats

Method:

  • Prepare brown rice ahead of time and keep aside.
  • Prepare the caramelized onions in advance and let it cool down. 
  • Add oil, mushrooms and all seasonings to a non-stick pan or pot, cook over medium heat until the mushrooms have released their juices and softened. Set cooked mushrooms aside.
  • In a food processor add walnuts and oats and process for 20 seconds until crumbly.  Add cooked brown rice, caramelized onions and cooked mushrooms.  Pulse until everything is well combined and no large chunks of anything remain. However, do not over-process the mixture – you don’t want it to turn into mush.  A little texture is good.
  • Use a table spoon to scoop out the mixture and form it into balls with your hands.  You should have about 18 balls.  Preheat a large non-stick pan over medium heat and coat the bottom of the pan in olive oil.  Once the oil is hot, place the balls in the pan.  The balls should not be touching each other, so do it in batches.  Cook the balls about 5 minutes per side or until all sides are seared, crispy and golden brown.
  • Serve over your gluten-free spaghetti with a generous garnish of grated gluten free cheese.

THE SIDE DISH

Herb Roasted Potatoes

Crispy outside and melt in your mouth inside, these herb roasted potatoes are what dreams are made of. This side dish definitely packs a punch and all you need are 4 ingredients to get it done.


Herb Roasted Potatoes


Ingredients:

  • 1 kg potatoes
  • 2 ½ tbsp olive oil
  • 3 tsp mixed dried herbs
  • Salt

Method:

  • Pre-heat your oven to 200C (390F) and then peel and chop your potatoes
  • Now place the potatoes into a large pot of water and a few pinches of salt and bring to a boil
  • Par boil the potatoes for 12 minutes 
  • Now pour 2-3 tbsp of olive oil into a large baking dish/tray and place in the oven to get very hot ready for the potatoes
  • Drain the potatoes and place the potatoes back into the pot you boiled them in, place the lid on and give them a couple firm shakes. This helps to break them up and to get nice and crunchy
  • Remove the baking dish from the oven, place the potatoes inside (you should hear them sizzling from the hot oil)
  • Drizzle over a good few glugs of olive oil across the potatoes making sure each is covered evenly, along with a few pinches of salt and your herbs. Give it a toss.
  • Place in the oven for 45 minutes
  • Remove from the oven, turn the potatoes so they cook evenly and place back in the oven for 45 minutes or until they’re golden and crispy

The Dessert

Vegan Rum Balls

We didn’t think vegan and gluten free desserts could taste heavenly, but we changed our minds with this recipe. Perfectly chewy, fudgy and flavourful, this one is our new favourite Christmas dessert.


Vegan Deserts


Ingredients:

  • 1 ½ cups almonds
  • 1 cup dried figs (pre-soaked and strained)
  • ⅓ cup cocoa powder
  • juice of ¼ lemon
  • 2 tbsp maple syrup
  • 1 tbsp pure vanilla extract
  • 3 tbsp rum (OR 2 tsp rum essence)
  • ⅛ tsp black pepper
  • pinch of salt
  • Optional: more cocoa powder for dusting (or can use icing sugar or shredded coconut)

Method:

  • Place the almonds into a food processor and process until they are finely crumbled (just a bit less fine than almond flour).
  • Add in all remaining ingredients and process until everything is combined and the mixture begins to form into a ball.
  • Take small bits of the mixture and roll into balls using your hands.
  • Optional: Roll in some extra cocoa powder for a dusted finish.
  • Enjoy right away or refrigerate for an hour or more for a firmer consistency.

We hope these recipes add in some merriment to your holly jolly Christmas celebrations. 

The Basics of Wine & Cheese Pairing

A fancy set up, with elegant wine glasses and a cheese board comes to your mind when you read the headline, right? While it may seem daunting at first, the world of wine and cheese is easy and a rather delicious one, once you get your basics right. 

This super simple and easy guide is going to help you become an expert at pairing. Consider this as your cheat sheet. Before we begin, let’s understand the pillars of both wine and cheese. 

Wine – Acidity, Sweetness, Body & Structure 

Cheese – Moisture Content, Fat Content, Texture, Flavour 

Okay, so let’s get to the serious business for now. To make it simple, we’re going to become a little cheesy – we mean, we’ll take cheese as the protagonist here and then talk about the types of wine that pair best with them. 

The Delicate Cheese

Remember, we mentioned the fat content and texture and two of the pillars of cheese? Taking that thought forward, buttery cheese like brie camembert and the less fussy ones and get along with most wines. (safe bet, we know!)

The fat content on these are perfectly balanced with the acidity of white and sparkling wines. If you’re feeling a little experimental, a sweet dessert wine would also do the work here. 

Recommended wines: Fratelli Sangiovese Bianco, Vallonne Vin de Passerillage


The Basics of Wine & Cheese Pairing


The Tough Nut

The hard and nutty ones like mozzarella and gruyere pair well with medium bodied reds to begin with. Since we’re talking about the basics here, the red wine’s sweetness complements the nutty flavour profile of the cheese creating a great culinary experience.

Recommended wines: KRSMA Estates Cabernet Sauvignon, Grover-Zampa La Reserve

Being Salty

Well, we know that no one appreciates people who’re acting salty, but when it comes to cheese, they’re just delicious. Salty cheese, which is also mostly crumbly in texture like feta and halloumi pair best with light-bodied white wines, rose and if you’re feeling a little celebratory, pop in the champagne

Recommended wines: Charosa Viognier Reserve, Chandon Brut Rosé NV

The Sour One

We love gorging on these cheeses, using them as spreads and alongside popular dishes, or just on bread. Yes, bread and cheese stands right next to the heavenly pairing of wine and cheese. These include sour cream, cream cheese, ricotta etc and as a rule of thumb, avoid painting it with full-bodied red wine. A light bodied red or white will do the trick here.

Recommended wines: J’Noon White, Grover Zampa Chêne Grande Reserve

High on Umami

The fruity and high on umami cheese are most common and liked by almost everyone! We’re talking about cheddar, colby, parmesan etc. You can pick a good medium to full bodied reds for this one.

Recommended wines: Reserve Tempranillo, KRSMA Sangiovese


wine and cheese


Now that you’ve got the cheat sheet with you, you’re already a pro. Like anything else, once you get on with it, with trial and error, you’ll finally master the right pairings.

Who knows, in a few months you wouldn’t even need this guide.

The Experts Guide to Setting the Perfect Dinner Table

Hosting again? Let’s get to talking tables. Setting a dinner correctly is not only an invaluable life skill but also a fantastic way to give your guests a wonderful evening that leaves them feeling enamored and impressed.

We’ve broken down the process of laying a basic, informal, and formal dining table right from linens, serveware, crockery, cutlery, and glasses. Read to know about the place-setting rules and ideas that help you set a splendid dinner table of dreams.

Basic Table

The basic table setting is a casual, no-frills necessary spread that is laid out for usual morning breakfasts or weeknight dinners. The table may be basic, but it’s put together enough to present a splendid meal.


Setting the Perfect Dinner Table


What you’ll need:

• Table mat
• Dinner plates
• Forks, knives, and spoons
• Drinking glasses
• Napkins

Directions

• Lay the table mat and place a plate in the middle
• Place a napkin on the left side of the table, adjacent to the plate
• A fork to the left on the napkin, a knife, and a spoon to the right (make sure the knife blade is pointing towards the plate)
• The glass must be positioned above the plate, or over the knife

Informal Table

Ideal for small gatherings such as special dinners, friendly reunions, or casual brunches, the informal table setting is an elevated version of the basic table with a fancier feel.


dinner table decoration ideas


What you’ll need:

  • Table cover, table runner (optional), table mats, and napkins
  • Dinner plates, quarter plates, and small plates
  • Salad fork (if you’re serving salad), soup spoon (if you’re serving spoon), dinner fork, dinner spoon, dinner knife, and dessert spoon.
  • Water glass, wine/cocktail glass, tea/coffee cup & saucer (optional)
  • Serving bowls, plates, and spoons

Directions

  • Lay the table cloth, and table mats and spread the table runner through the middle of the table (you can use a circular one for round tables)
  • The serverware is placed on top of the table runner
  • Place the dinner plate in the middle of the mat, with the quarter plate on top. Alternatively, you can also place the quarter plate to the left of your forks.
  • The bowl goes on top of the dinner plate (or quarter plate if that’s on top of the dinner plate).
  • Place the napkin to the left of the decorative plates
  • Place the fork on the napkin left on the dinner plates. Put the knife on the right side of the plates and next to it place the spoon.
  • A water glass with a wine/cocktail glass to its right; a tea or coffee cup to the right of the wine glass

Formal Table

This is the setting fit for birthday dinners, wedding dinners, festive feasts, or official suppers. Such scrumptious spreads require showstopping tableware, right from the entrée ensembles to the main course extravaganza.

One of the main additions to the formal setting is the introduction of a charger plate. A charger plate is essentially a presentation plate that no one eats from. While traditional table etiquette dictates that a charger plate is an integral part of a formal setting, we believe that no rule is set in stone, and one doesn’t need to go out of their way to purchase them. However, touché if you do use a charger plate.


dinner table decoration ideas

dinner table decoration ideas


What you’ll need:

  • Table cover, table runner (optional), table mats, and napkins
  • Charger plates, dinner plates, quarter plates, and small plates
  • Flatware: salad fork, soup spoon, fish/oyster fork, dinner fork, dinner knife, dinner spoon
  • Water glass, a white wine glass, and a red wine glass
  • Serving bowls, plates, and spoons
  • Placards (optional)

Directions

  • Lay the table cloth, and table mats and spread the table runner through the middle of the table (you can use a circular one for round tables)
  • The serverware is placed on top of the table runner
  • Place the charger plate under the plate your first course will be served in, the quarter plate can either be placed under the bowl or go to the left of your forks.
  • Place a napkin on the left side of the charger plate
  • On the left side, adjacent to the charger, place the salad fork outside and the dinner fork inside. You may also put both forks on the napkin or you may even place the forks between the napkin and charger.
  • Put the knife on the right side of the charger plate (blade pointing towards the charger) and next to the knife place the soup spoon.
  • Just above the charger place the tablespoon. The mouth is facing the left and the handles pointing to the right.
  • Place the water glass on the top right, directly above the knife. To the right of the water glass slightly upward, place the red wine glass, and just below the red wine glass and slightly downward to the right place the white wine glass.

Breaking the Rules

Now, to add a little personal touch, Spreeh recommends a few tips you could use for a dinner table that speaks to your style.

  • Feel free to throw in some colorful glassware to break the monotony of colorless glass
  • With tableware, mixing a few vintage pieces with old favorites is always a welcome idea to add character
  • If you’re feeling up for it, think about strategically mixing and matching your fine china to serve dinner with a side of creativity


The Experts Guide to Setting the Perfect Dinner Table

The Perfect Music Playlist for a Dinner Party

Music is that silent guest to a party that’s not particularly invited but has the ability to make or break a party. The background score, if decided meticulously, can level up your party. Think about it, when you step out for a meal and the food is great, so are the cocktails but the music is completely off; you might stretch through the meal but not come back again, right?

So it’s the festive season and you’re hosting a dinner party at your place. You have everything in place – from the theme to the decor to the food and even the games! It’s time to complete it by setting up just the right music. You’re in luck, we’ve got you a mix of few different playlists with artist recommendations that you can mix and match depending on the mood and theme of your party.


The Perfect Music Playlist for a Dinner Party


Go Low-fi R&B 

Now, music is just a side yet important guest at your party, so it cannot be loud and overtake the evening, leaving your guests shouting to have a conversation. Low-fi R&B is your saviour here. It’s mostly soothing beats with minimal lyrics. Artists like Janet Jackson, Baby Rose have the perfect music for this mood. 

To make things easier, we’ve got you a ready playlist. Before you play it make sure, you have an ad-free version of the application you’re streaming the music on. 

Make it fancy with Jazz 

If you’re hosting a party which has a menu with wine, cheese and the likes, then you need music that’s slightly nuanced and may we say, a tad old school. What better than some Jazz tunes to set the evening into motions. 

You can go classic on this one with artists like Louis Armstrong, Nat King Kole, Frank Sinatra or new-age Jazz artists who bring a little funk to this style like Tom Misch, Ezra Collective etc. Here’s your playlist which would perfectly blend in any party. 


dinner party ideas


Paint it Blue

The most classic and known from the lot, Blues music is something that’s heard by everyone at some point in their life. There are multiple types of blues; depending on the theme of your party, you can select the artists. We’d recommend Janis Joplin, BB King, Eric Clapton. 

You can pick an artist and use the Radio feature on the application and it’ll make you a ready playlist. Make sure you keep the volume in check on this one. Alternatively, here’s a playlist we’ve found for you. 

Soft Rock for the dancers 

If your dinner party is something which intends to keep people on their toes, then soft rock is what would get the feet moving. The thumb rule here is to go with the classics, cause no matter, everyone’s heard these once in their lifetime. Sting, Queen, David Bowie, mix the bag with some new age artists like FKJ, Masego, The Strokes etc. Here’s the perfect playlist to get you started.

Low-key bollywood for the soul

If we turn the clock back a little, bollywood got us some soulful classics that will always remain evergreen. At a dinner party, if you intend to stir some nostalgia up, prepare a playlist with the music of all the maestros – Kishore Kumar, Lata Mangeshkar, R.D Burman, AR Rahman and the likes. 

No matter the generation, everyone’s heard these songs and this would make for a great sing along party! How about a ready playlist for you? 


You can always keep a mix bag and keep switching between playlists depending on the mood of the party and how it escalates. Here’s a pro-tip – if it’s an intimate gathering, ask your guests before the party to share their top 5 songs with you and combine all to make a playlist. 

The Complete Guide to Planning an Authentic Mexican Fiesta (Part I)

The Feast 

Food Menu 

True Mexican food is at the heart of an authentic Mexican Fiesta. Rich, flavourful, and fresh, Mexican cuisine is an exciting favorite that really inspires guests to dig in and savor its flavors. The cuisine has some spicy and tangy taste notes that take you on a satisfying culinary journey.

Here’s what Spreeh recommends for your Mexican Fiesta menu (click the link for the recipe and scroll through the pictures for some chic plating ideas!):

Ultimate Mexican Nachos

Loaded, crunchy, and finger-lickin’ good Nachos are a permanent fixture in every Mexican fiesta. They make for the most addictive appetizer and they’re easy to make!


Fajitas

A simple but vibrant dish that packs a robust Mexican flavor. You can put together the fajita rolls yourself, or present the appetizer on the table and invite guests to make their own masterpieces!


Taco Buffet

Here’s where you can get really creative! You can include shredded chicken or fish, refried beans, shredded salad, salsa, sour cream, cilantro, and plenty of lime wedges for garnish.


Grilled Mexican Street Corn

Juicy, crispy, creamy, and zesty with a hint of chili, the Mexican street corn makes for a super side dish that really elevates the flavor of the feast in true Mexican fashion.


Mexican Rice

A marvelous Mexican main dish, the tangy tomato rice can be made cheesy or with veggies or with chicken, and it can be prepped as a one pot dish.


Rotisserie Chicken (optional)

If your fiesta favors a non-vegetarian main dish, you can go for an authentic Mexican Rotisserie Chicken Pollo Asado – whole chicken grilled in a tart citrus marinade and rubbed with hot Mexican spices. But you’ll preferably need an outdoor grill or oven with a rotisserie attachment.


Churros with Hot Chili Chocolate for Dessert!

And finally, we have these decadent Mexican doughnuts served with rich, chili-spiked hot chocolate for some delicious dunking!


Drinks Menu  

A fun fiesta favors a fully stocked bar, and we have just the right list of Mexican cocktails & mocktails you need for your Mexican fiesta to be a high-flying success!

The Perfect Margarita

The classic on-the-rocks margarita with the perfect cocktail ration: 3 parts tequila or agave spirit, 2 parts triple sec liqueur, and 1 part freshly squeezed lime juice


Paloma Picante

Paloma’s are cocktails like margaritas with their own citrusy flair. Tart and tangy grapefruit soda are added, along with a pinch of Mexican chili-lime seasoning that artfully decorates the rim of the glass.


Mexican Strawberry Water (Agua de Fresca)

Flavourful and refreshing non-alcoholic fresh fruit waters made with real crushed or blended fruit. A perfect cooling accompaniment with the spicy cuisine.


Watermelon Lime Agua Fresca

A favorite of the Mexicans, the Watermelon Lime Agua Fresca is a refreshing non-alcoholic drink that’s served tall with ice. You can also give it your own spin by adding cantaloupe or honeydew!


Mexican Beer

And for those who prefer to go for their usual chilled beer, you can always serve some Mexican beers such as Sol or Corona that are available in India.